

At Cantina, the team is constantly experimenting and shipping security agents to address security problems that lack determinism. As organizations adopt AI to augment their security capabilities, security agents can live in many different places. After speaking with many security practitioners at BlackHat, I learned that not every security team is using security agents. To be fair, AI-powered agents should be treated with the proper due diligence and skepticism because using AI in security teams is just one element in a comprehensive security program that is made up of people, process, and technology.
As a kinesthetic learner, I learn by doing and applying nebulous concepts that help build a proper mental model. What better way to learn about AI agents than by building a simple exposure analysis agent? This write-up will be more relevant to people who have not built sophisticated agents and orchestration systems.
Prerequisites:
- Cloudflare Account (Free Tier is sufficient)
- A Cloudflare zone for the hostname that fronts the agent
- Cloudflare Zero Trust, for the Access application protecting that hostname
- Wrangler, which is pinned in the example repository and installed by
npm ci - Node.js 22
- Example Source Code

Vibing
As we enter the age of vibecoding, anyone can fire off a short prompt to create a web application and publish it to a platform like Vercel or Replit. This capability has enabled many non-engineering teams to quickly solve problems without having to find engineering resources to develop custom applications. This presents an unintended consequence where well-intentioned employees may unknowingly expose web applications that are not intended for public consumption.
The first questions that need to be answered are: “What are all my Vercel projects and how can I compile an array of Vercel URLs?”
This can be done using the Vercel REST API by enumerating every team in a Vercel account, listing every project, and grabbing all domains per project. Depending on your organization, this can produce a large list of hosts. Fortunately, Vercel has a set of Protect Deployments features that can address most exposure issues by project. The project deployment settings are returned in a payload when performing a GET request to https://api.vercel.com/v10/projects therefore it may not be necessary to check every host for potential exposure. This enables filtering of hosts that lack deployment protection, which makes the potential exposure list much smaller.
{
  "id": "prj_abc123xyz",
  "name": "my-secure-project",
  "slug": "my-secure-project",
  "teamId": "team_xyz789",
  "accountId": "usr_123456",
  "createdAt": 1609459200000,
  "updatedAt": 1640995200000,
  "framework": "nextjs",
  "productionDeploymentsFastPath": true,
  "latestDeployments": [],
  "ssoProtection": {
    "deploymentType": "prod_deployment_urls_and_all_previews"
  },
  "passwordProtection": {
    "deploymentType": "prod_deployment_urls_and_all_previews",
    "password": "hashed_password_value"
  },
  "trustedIps": {
    "deploymentType": "prod_deployment_urls_and_all_previews",
    "protectionMode": "additional",
    "addresses": [
      {
        "value": "203.0.113.42",
        "note": "Corporate office"
      },
      {
        "value": "203.0.113.0/24",
        "note": "VPN range"
      }
    ]
  },
  "passport": {
    "deploymentType": "all"
  },
  "trustedSources": {
    "deploymentType": "prod_deployment_urls_and_all_previews"
  },
  "protectionBypass": [
    {
      "scope": "automation"
    }
  ]
}
If you enforce deployment protection on every Vercel project by default and there are no volunteers to check every single vercel site that lacks deploy protection on a regular cadence, this could be a use case for automation.
The concept
At Cantina, we like building agents to help perform meaningful security work. For no other reason than I like Cloudflare, I decided to build an “exposure agent” using a combination of Cloudflare Workers, D1, R2, Workflows, Durable Objects, Browser Run and Cloudflare Access.
| Product | Who can use it |
|---|---|
| Workers + Access | Any Access identity that also exists in principals |
| D1 | read lists; scan inserts scan rows; admin mutates scope and triage |
| R2 | read via get_evidence; writes happen inside TargetWorkflow |
| Workflows | scan starts/polls TargetWorkflow; cron starts sweep and expire |
| Durable Objects | Same read / scan / admin checks as MCP |
| Workers AI | Only from TargetWorkflow (scan or cron), not an MCP tool |
| Browser Run | TargetWorkflow (scan or cron); TriageAgent browse (read) |
The agent needs two triggers that align with continuous and adhoc exposure checks of potentially exposed assets. The agent can be triggered through MCP by another agent or through a built-in scheduled Worker job, which is essentially a cron job that looks for active hosts and triggers the exposure scan.
Scheduled                            On demand
nightly cron → sweep active hosts    MCP client → Access → MCP tools
                │                              │
                └──────────────┬───────────────┘
                               ▼
        ┌────────────────────────────────────────────────┐
        │ each in-scope host                             │
        │                                                │
        │   Scan ──► Detectors ┄ no hits ┄► Workers AI    │
        │     └───► Screenshot                           │
        └────────────────────────────────────────────────┘
                     │                    │
                     ▼                    ▼
              Findings · D1        Screenshots · R2
Scope
In an ideal scenario, the exposure check should be defined ahead of time or at least auditable. One approach is to use a D1 table to store targets. This would be the workflow:
MCP add_target / put_targets
        │
        ▼
   D1 targets table  (host PK, status, expires_at, auth ref)
        │
        ▼
 assertInScope(url)  ← TargetWorkflow, MCP probes, TriageAgent
        │
        ├── ok → normalized host, proceed with GET/HEAD / browser
        └── throw → no outbound request
This check is done in exposure-agent-walkthrough/src/core/scope.ts, where assertInScope matches the requested hostname against the targets allowlist before any outbound request. The allowlist is what bounds SSRF here rather than the Worker itself however the check is on the hostname only, so an in-scope host that resolves to internal space would still be fetched because the resolved IP is never enforced. On Cloudflare’s egress that stays a minor risk since there is no metadata endpoint to reach. These targets are managed in a targets table in D1.
| host | status | added_by_principal | authorization_ref | added_at | expires_at | notes |
|---|---|---|---|---|---|---|
| app.example.com | active | test-admin-key | user-request-2026-08-18 | 1787058175819 | 1787662975819 | User-requested one-off check |
The scan
In a typical security exposure check, a list of hosts will likely need scanning. The D1 database will act as an audit log and capture state using the scans table. For all valid scan targets, the worker should resolve DNS over HTTPS, GET the root without following redirects, and only on an HTTP 2xx ask Browser Run for HTML, markdown, and a screenshot in R2.
Cloudflare’s Browser Run (formerly Browser Rendering) provides a programmatic way to use a headless Chrome browser which is perfect for the exposure analysis use case. This is accomplished in /src/workflows/target.ts.
const render: RenderedPage = await step.do("render-browser", async () => {
  if (probe.status < 200 || probe.status >= 300 || !this.env.BROWSER) {
    return { markdown: "", html: "", screenshotKey: null };
  }
  await assertInScope(probe.url, this.env.DB);
  try {
    const [contentResponse, markdownResponse, screenshotResponse] = await Promise.all([
      this.env.BROWSER.quickAction("content", { url: probe.url }),
      this.env.BROWSER.quickAction("markdown", { url: probe.url }),
      this.env.BROWSER.quickAction("screenshot", { url: probe.url }),
    ]);
    // ... store the screenshot in R2, return html + markdown + screenshotKey
  } catch {
    return { markdown: "", html: "", screenshotKey: null };
  }
});
In addition to host classification, each site is also screenshotted using Cloudflare’s Browser Run and saved to an R2 bucket. These screenshots are not used in the exposure agent, however it is trivial to extend this functionality.
Detectors
In order to keep costs low, deterministic logic should be applied before deferring to an AI model for inference. Deterministic logic is used for probing sensitive paths and detectors. This agent uses a concept called detectors to deterministically figure out what exposure characteristics exist for a host. The detectors are written as pure TypeScript functions that take DetectorContext (the HTTP probe, optional render, DNS, and path results the workflow already collected) and return FindingInput[]. The agent includes these four detectors which use local constants such as regex tables and fingerprint lists.
| Module | detector id |
Reads | Typical fire condition |
|---|---|---|---|
no-auth-gate.ts |
no-auth-gate |
probe, render |
2xx app body, no 401/403 / WWW-Authenticate / Access / login redirect / password form |
unauth-admin.ts |
unauth-admin |
probe, render |
Same auth exits, then regex/header fingerprints (Grafana, Jenkins, …) |
leaked-artifact.ts |
leaked-artifact |
paths, also root probe for directory listing |
Path probe 200 plus content that matches git HEAD, .env, swagger, actuator, etc. |
dev-staging-origin.ts |
dev-staging-origin |
host, probe, doh, paths (/robots.txt) |
Staging-ish name, bare IP, missing noindex, private IPs in DNS |
When the detectors find nothing at all, the analysis is delegated to Workers AI which runs inference using a defined model. Cloudflare’s Workers AI enables a simple way to serve a small language model, where the model and inference occur on Cloudflare’s infrastructure. The Cloudflare worker has an AI binding which allows classification, for example:
if (this.env.AI && probe.status === 200 && probe.body.length > 200 && findingsList.length === 0) {
  try {
    const aiResp: any = await this.env.AI.run("@cf/meta/llama-3.3-70b-instruct-fp8-fast", {
      messages: [{ role: "user", content: `Classify whether this anonymously rendered application is an exposed internal service. Return JSON with isExposed, confidence, and reason.\nHost: ${host}\nRendered markdown:\n${(render.markdown || "").slice(0, 5000)}` }],
      response_format: { type: "json_object" },
    });
    // ... push onto findingsList if isExposed && confidence > 0.8
  } catch {
    // AI is advisory; deterministic scanning and persistence still complete.
  }
}
This example exposure agent just uses meta/llama-3.3-70b-instruct-fp8-fast for demonstration purposes. For a production agent, benchmarks and evals would be done to find the most cost-effective model.
The question put to the model is deliberately narrow, since it only has to decide whether the rendered markdown belongs to an internal service that anyone can reach. The rendered markdown is content the scanned host controls however, so a hostile page can try to steer the classifier, which is bounded to a false positive because the model only runs when the detectors found nothing and can add a finding but never suppress one or write to D1.
- A yes with confidence above 0.8 is stored as a no-auth-gate finding, and that 0.8 is the model’s own number rather than a calibrated probability.
- An AI miss or “no” does not fail the scan.
Findings
After a target has gone through the analysis using detectors or LLM inference, findings are generated for each host in order to determine potential exposures. A 200 on a host’s /admin is not enough, since admin pages could require authentication. A finding is recorded only when the detector sees no auth wall, login form, or Cloudflare Access. These findings are written to a D1 findings table.
| Field | Value |
|---|---|
| id | blog.example.com:no-auth-gate:exposed-application-with-sensitive-keywords-blog-example-com |
| target_host | blog.example.com |
| detector | no-auth-gate |
| severity | critical |
| state | open |
| title | Exposed Application with Sensitive Keywords (blog.example.com) |
| description | The host blog.example.com returned HTTP status 200 and served application content without any authentication gate (no 401/403, no WWW-Authenticate header, no login redirect, and no Cloudflare Access protection). |
| evidence | status 200; hasPasswordForm false; sensitiveKeywordsFound true; content-type text/html; Hugo 0.140.0 personal blog |
| r2_screenshot_key | screenshots/blog.example.com/1787022070526-xb5bck.png |
| first_seen_at | 1786806913505 (2026-08-15T15:15:13Z) |
| last_seen_at | 1787022072538 (2026-08-18T03:01:12Z) |
| resolved_at | NULL |
The full response headers and HTML snippet are omitted from the evidence cell so the table stays readable. This row is a public Hugo blog, not an internal app: no-auth-gate treated a 200 with a keyword hit as proof.
Lifecycle
Those findings are then diffed against D1 by a stable host:detector:title id: new ones open, still-present ones update, open ones missing from a completed scan become fixed, and a later rediscovery reopens fixed. Analyst accepted_risk / false_positive dispositions stay put. A failed scan, including a blown path probe, leaves existing findings unchanged, so you only close a ticket after completed and fixed.
detector fires
new finding id
      │
      ▼
    open ── missing from a completed scan ──► fixed
      │                                         │
      │ ◄──────────── rediscovered ─────────────┘
      │
      ├── triage_finding ──► accepted_risk
      └── triage_finding ──► false_positive
Orchestration
The exposure agent uses Cloudflare’s Workflows as an execution plane, which provides the durable, multi-step execution that is required by the agent. The following Workflows are used in the example agent.
| Workflow | File | What it owns |
|---|---|---|
TargetWorkflow |
src/workflows/target.ts |
One host, one scan: mark-running, assert-scope, resolve-dns, probe-root, render-browser, probe-paths, classify-findings, persist-findings |
SweepWorkflow |
src/workflows/sweep.ts |
Nightly fan-out over active targets, batched 100 at a time via createBatch |
ExpireWorkflow |
src/workflows/expire.ts |
Retires targets whose expires_at has passed |
These actions are separated from the exposure agent worker because Cloudflare Workflows provide this overall reliability:
- Steps are checkpointed, so a scan that dies during
probe-pathsresumes there instead of re-probing the root and re-rendering the browser, which already wrote a screenshot to R2. - Retries are idempotent on the scan row:
mark-runningusesON CONFLICT(id) DO UPDATE SET status = 'running', error = NULL(target.ts:30-34). - A hundred hosts do not fit in one Worker invocation.
createBatchgives each host its own instance with its own lifetime and retry behaviour. - Failure is per host. One host timing out does not fail the other ninety-nine, and its findings stay untouched.
The nightly trigger is defined in wrangler.jsonc as "0 3 * * *", and the scheduled handler in src/index.ts creates ExpireWorkflow before SweepWorkflow. Expiry is enforced in two places, since the sweep’s own query only selects targets whose expires_at is still in the future. Running the expiry first is what keeps the stored status honest, so a lapsed target is not still reported as active by list_targets. SweepWorkflow also checks a pause flag in the settings table before it fetches a single target, which means the kill switch takes effect before any outbound request is made.
In addition to the root request, the workflow probes a fixed list of ten paths defined as PROBE_PATHS in src/workflows/target.ts, covering /.git/HEAD, /.env, /swagger.json, /openapi.json, /api-docs, /actuator/health, /actuator/env, /server-status, /.DS_Store and /robots.txt. Every one of those paths is passed through assertInScope before the request, which keeps the probe set inside the same scope boundary as the root. This example agent does no crawling and no URL discovery, so the probe set stays fixed at whatever was configured.
Access and roles
The following tool calls are exposed in the exposure agent MCP server which can be found in exposure-agent-walkthrough/src/mcp/tools.ts with a simple RBAC model. This allows agents to perform adhoc scans or review previous scans which can be very beneficial for this use case.
| Tool | Min role | Description |
|---|---|---|
list_targets |
read | List all target assets registered in scope with their attestation metadata and expiry |
list_findings |
read | List exposure findings filtered by host, detector, severity, state, or timestamp |
get_finding |
read | Get full details, evidence, and screenshot keys for a specific finding |
get_evidence |
read | Read a stored evidence object for a finding |
browse_target |
read | One-shot render and inspect an in-scope URL using Browser Run or HTTP probe |
scan_target |
scan | Launch a scan workflow against an in-scope target host |
get_scan_status |
scan | Poll the status and progress of a scan instance |
put_targets |
admin | Atomically replace the whole set of scope targets. Missing active targets are retired. |
add_target |
admin | Add or reactivate a single target host in the scope registry |
remove_target |
admin | Retire a target from active scope without deleting finding history |
triage_finding |
admin | Update the state of a finding (e.g. mark fixed, accepted_risk, false_positive) |
Every request to /mcp and /agents requires a Cloudflare Access assertion, which the worker verifies against the team’s JWKS, audience, and expiry before any tool runs. A service token client ID is not accepted as a bearer token on its own, since automation presents the client ID and secret to Cloudflare Access and the worker trusts the signed assertion that comes back. The example exposure agent provides three available roles: read, scan, admin, which are defined in the principals table in the D1 database. These are manually added for the sake of simplicity.
In addition to the MCP server, the exposure agent exposes a TriageAgent which is a Durable Object that another agent can call directly at /agents. A Durable Object is essentially a Worker with a stable identity and its own storage, where every request for the same object id is routed to the same instance instead of whichever worker happens to be free. This is done in exposure-agent-walkthrough/src/agent/triage.ts using the agents SDK, where each method is marked callable and runs the same permission check as its equivalent MCP tool.
Listing targets, listing findings, and browsing a URL require read, launching a scan requires scan, and changing a finding’s state requires admin. The protocol is different however the authorization model is identical. This example does not use the Durable Object’s own storage and reads everything from D1.
Agent interaction
The exposure agent has a /mcp endpoint which is intended to be protected by Cloudflare’s Access, so authentication is done by the CF-Access-Client-Id / CF-Access-Client-Secret service-token pair. Giving the agent an MCP endpoint allows coding harnesses like Claude Code to combine skills you already have with the exposure agent’s tool calls. Adding the exposure agent is as simple as:
claude mcp add --transport http exposure-agent https://<YOUR_SECURITY_AGENT_HOST>/mcp \
  -H "CF-Access-Client-Id: <CLIENT_ID>" \
  -H "CF-Access-Client-Secret: <CLIENT_SECRET>"
The service token’s Client ID has to exist in principals with the role the harness actually needs, which for a skill that reads findings and starts adhoc scans is scan and never admin.
The same endpoint can be registered in Clarion, the security platform we build at Cantina, as a custom MCP server that its triage agents load as tools. Two things differ from the harness case. Clarion resolves upstream auth to a single Authorization: Bearer value, either a static key or an OAuth 2.1 token set it refreshes server side, so the Access service-token pair does not carry over and the Worker’s auth module would need to accept one of those instead. A workspace admin also approves each tool’s input schema before an agent can load the server, and outbound arguments are filtered to the keys in that approved schema, so a tool that starts advertising new parameters is held back until someone approves the change.
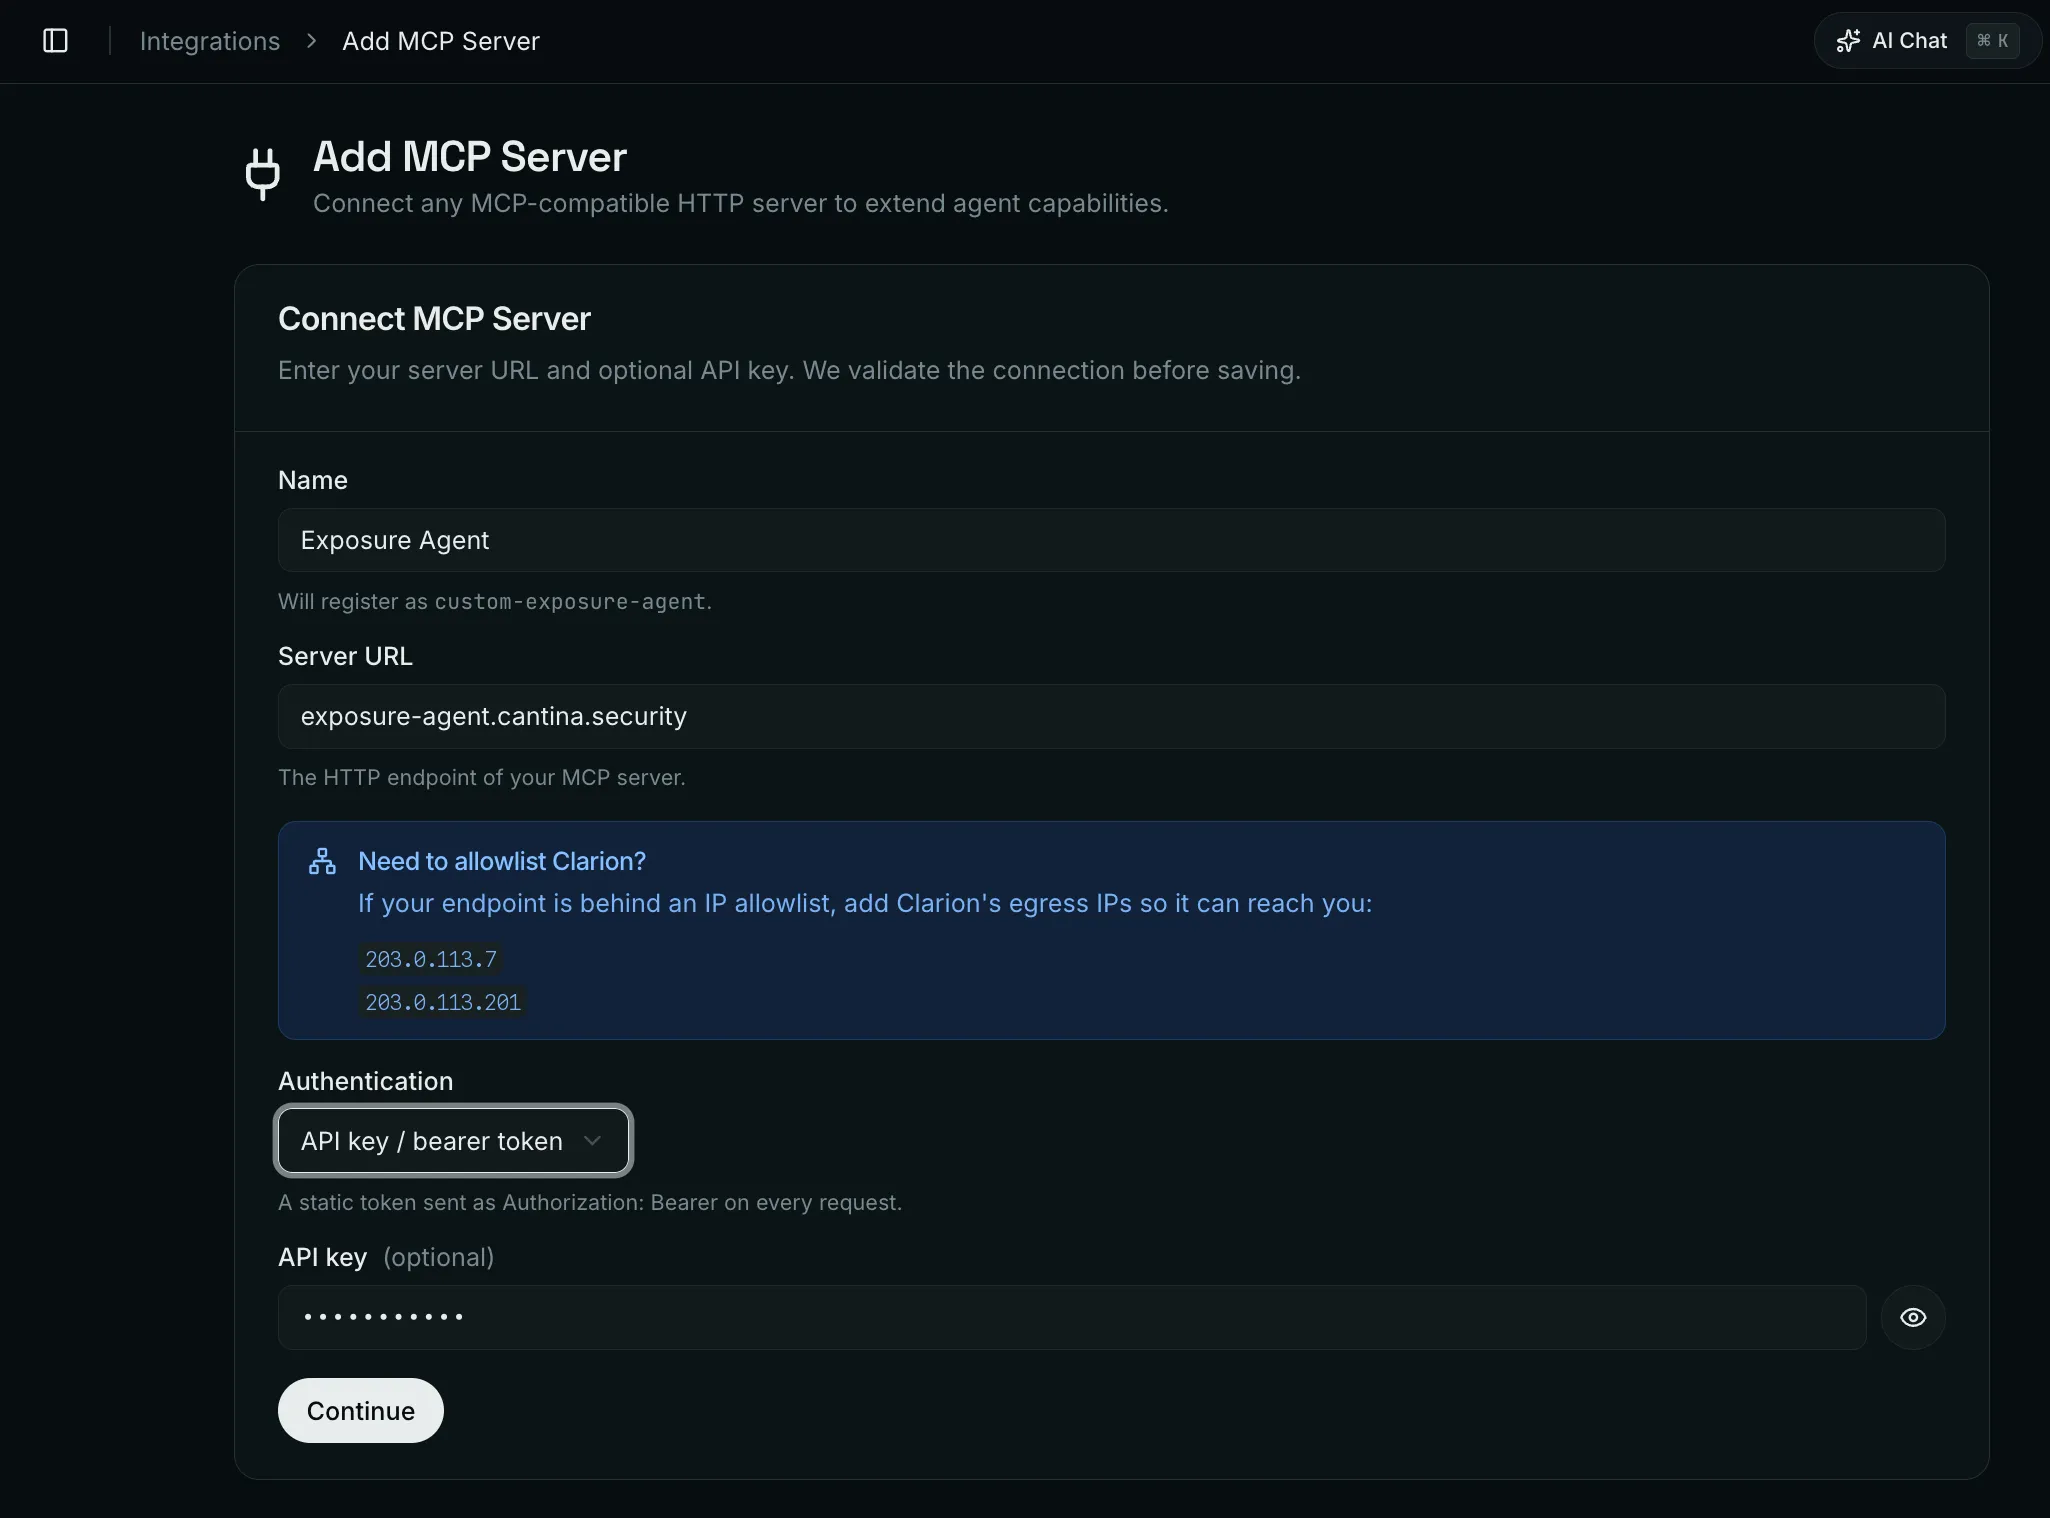 Egress IPs in this screenshot are replaced with RFC 5737 documentation addresses. Read the real ones from your own workspace.
Closing the loop
Exposure findings and their current state are stored in the findings table, which at any point looks like this:
| Host | Detector | Severity | State | Why it sits there |
|---|---|---|---|---|
| blog.example.com | no-auth-gate |
critical | open | 200 with app content, no auth gate, sensitive-keyword hit. Never triaged, so it stays open. It is a public Hugo blog. |
| blog.example.com | leaked-artifact |
low | open | /.DS_Store returns 200. A deterministic path probe, so there was nothing to interpret. |
| app.example.com | no-auth-gate |
high | false_positive | Chromium render shows a public marketing page with a Log in link in the header. The app sits behind that login. |
| team-meet.vercel.app | no-auth-gate |
critical | false_positive | Root serves a “Sign in with Google” form in the initial HTML. The page is the gate. |
No finding has reached fixed or accepted_risk yet. fixed requires a completed scan where the finding no longer appears, and nothing has been remediated.
An external system integrates against those states. One example loop:
- Your ticketing automation asks the agent for open findings it has not seen yet, calling
list_findingswith a watermark from its last successful run. - It uses
finding.idas its deduplication key, so the same exposure never opens a second ticket. - It maps the finding’s severity and the host’s owner onto whatever queue and priority scheme you already run.
- Someone either fixes the exposure or decides it is acceptable and records that decision instead.
- The automation starts a rescan and polls
get_scan_statusuntil it reportscompleted. - Only then does it look at the finding again, and it closes the ticket only if the state has moved to
fixed.
Step 6 waits on step 5 because a failed scan leaves existing findings unchanged, so fixed only means the exposure is gone if the scan is actually completed.
None of that loop needs much privilege. Pulling findings and kicking off a rescan are read and scan work, and only step 4, where a human records a disposition, needs admin. Keeping the ticketing integration on its own read or scan identity means it cannot add a host to scope.
The agent promises the other system two things: a finding’s state, and an id that does not change between scans. Where the ticket lives, who owns it, and when it was closed all stay in the vendor system.
On the receiving end, that division is visible in the ticket itself, where the state and the id came from the scanner and everything else was added after.
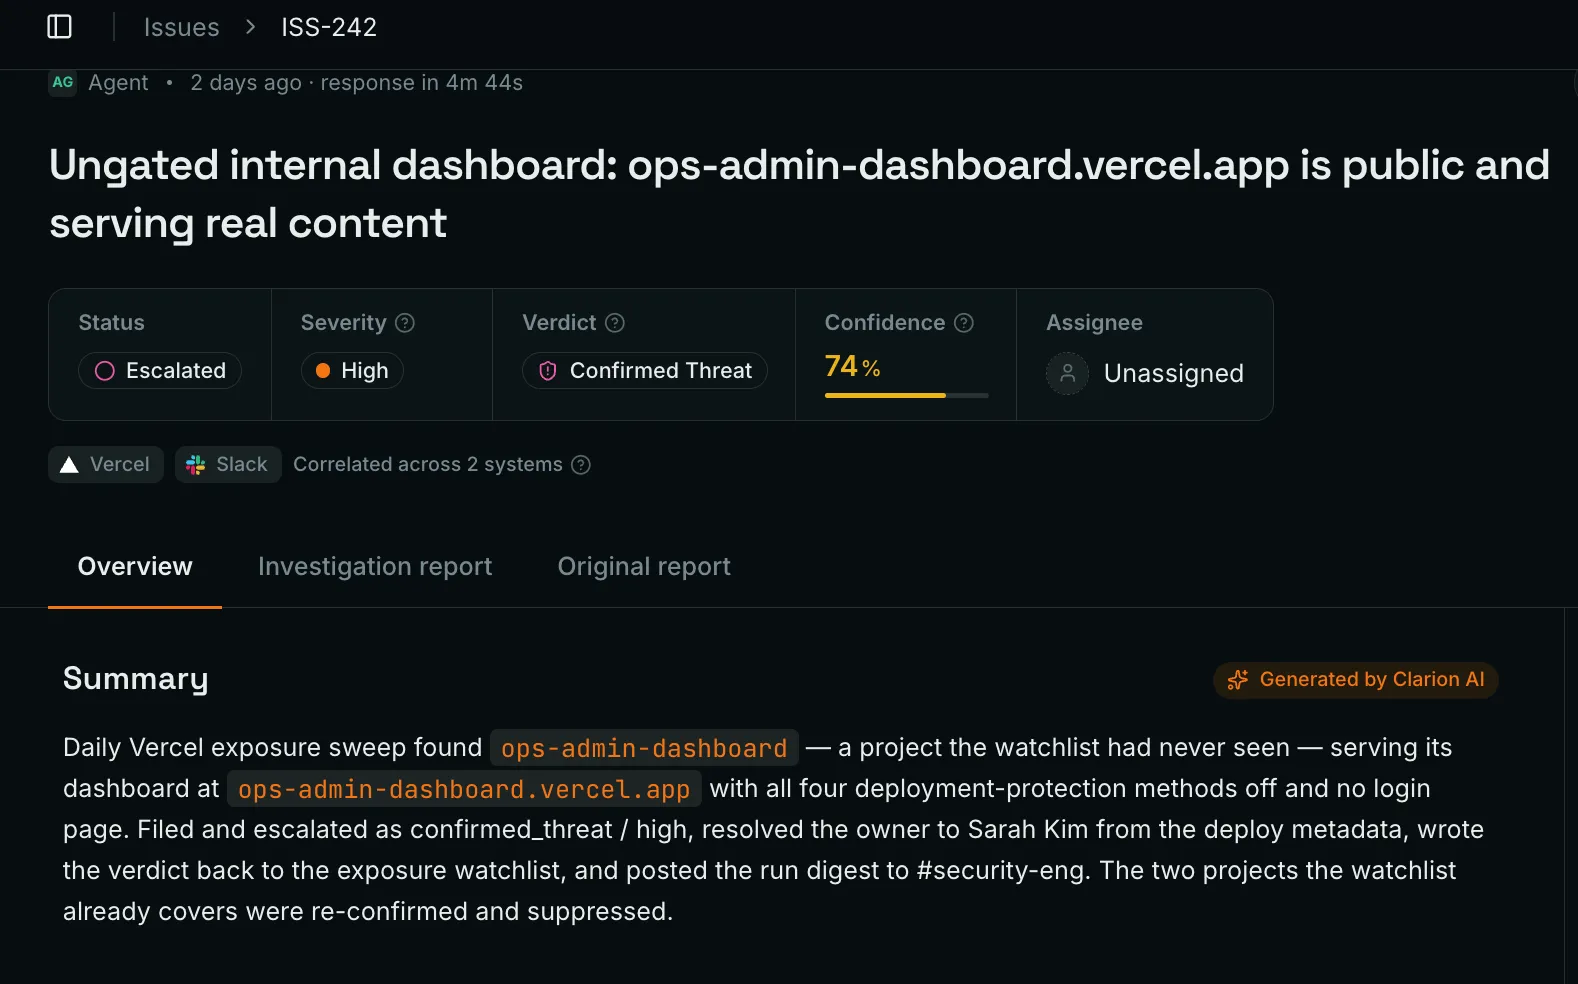 This issue came from Clarion’s own Vercel sweep rather than the agent in this post, however the handoff is the same. The owner resolution, escalation, and Slack digest all happen after the finding arrives.
Summary
Run against a small set of hosts, the agent produced four findings. One of them, a .DS_Store served at 200, was unambiguous, low severity, and needed no rendering or inference to confirm. Two were false positives that failed the same way: a public landing page with a login form on it is a gate, and no-auth-gate has no way to see that. The fourth is a public blog nobody has bothered to triage. The two critical findings were the wrong ones, and the cheapest deterministic check was the only one that was right.
Several limits are worth naming before anyone points this at real infrastructure. Browser Run may load cross-host subresources or follow client-side navigation after the initial scoped URL, so it collects evidence and does not enforce the scope boundary. The artifact detector probes a fixed path list with no URL discovery, so it finds what you thought to ask for and nothing else. AI classification can fail or disagree with the detectors, which is why it stays advisory and never controls persistence. R2 evidence needs a retention policy before any of this goes to production. Cloudflare egress is external, but a target can treat Cloudflare address space differently from a normal browser, so the absence of a finding is weaker evidence than it looks.
This walkthrough is intended to build something concrete that addresses a real risk. My preference is to learn by building. The hard part was never giving an agent compute, since reachability is easy to test. Most of the work went into deciding what counts as authorization, what counts as proof, what should happen when a step fails, and how a verdict reaches a queue that someone already operates. That is where most of the code in the repository ended up.